So my 6 year old and I were having this argument about what this My Little Pony character's name was.
I INSISTED it was shutterfly.. like the website. She INSISTED that it was fluttershy. Somehow after discussing this for like an hour, I convinced the poor girl that it was shutterfly. Mommy always wins.. then we went to this My Little Pony birthday party where the birthday girl herself told me the pony was Fluttershy. AH! I led my poor girl astray because of my pride telling me that a 6 year could not know more than her much older and wiser mother. Oh the young will shame the old.
So I was asked to make these cookies for a friend's daughter's party and so I thought I would do my first tutorial. So bare with the me here if it's too wordy or boring. :)
First things first, draw the picture on a piece of paper. Because I don't own a kopykake and didn't want to spend $ on a cutter that I might never use again, I did this all by hand. I drew fluttershy and E embellished it with the butterflies and the stripe in the tail. :)
 |
| I put packing tape around the edges so that the image was a little firmer when cutting the dough, and so the ink wouldn't be in direct contact with the dough. |
 |
| Roll out the dough |
 |
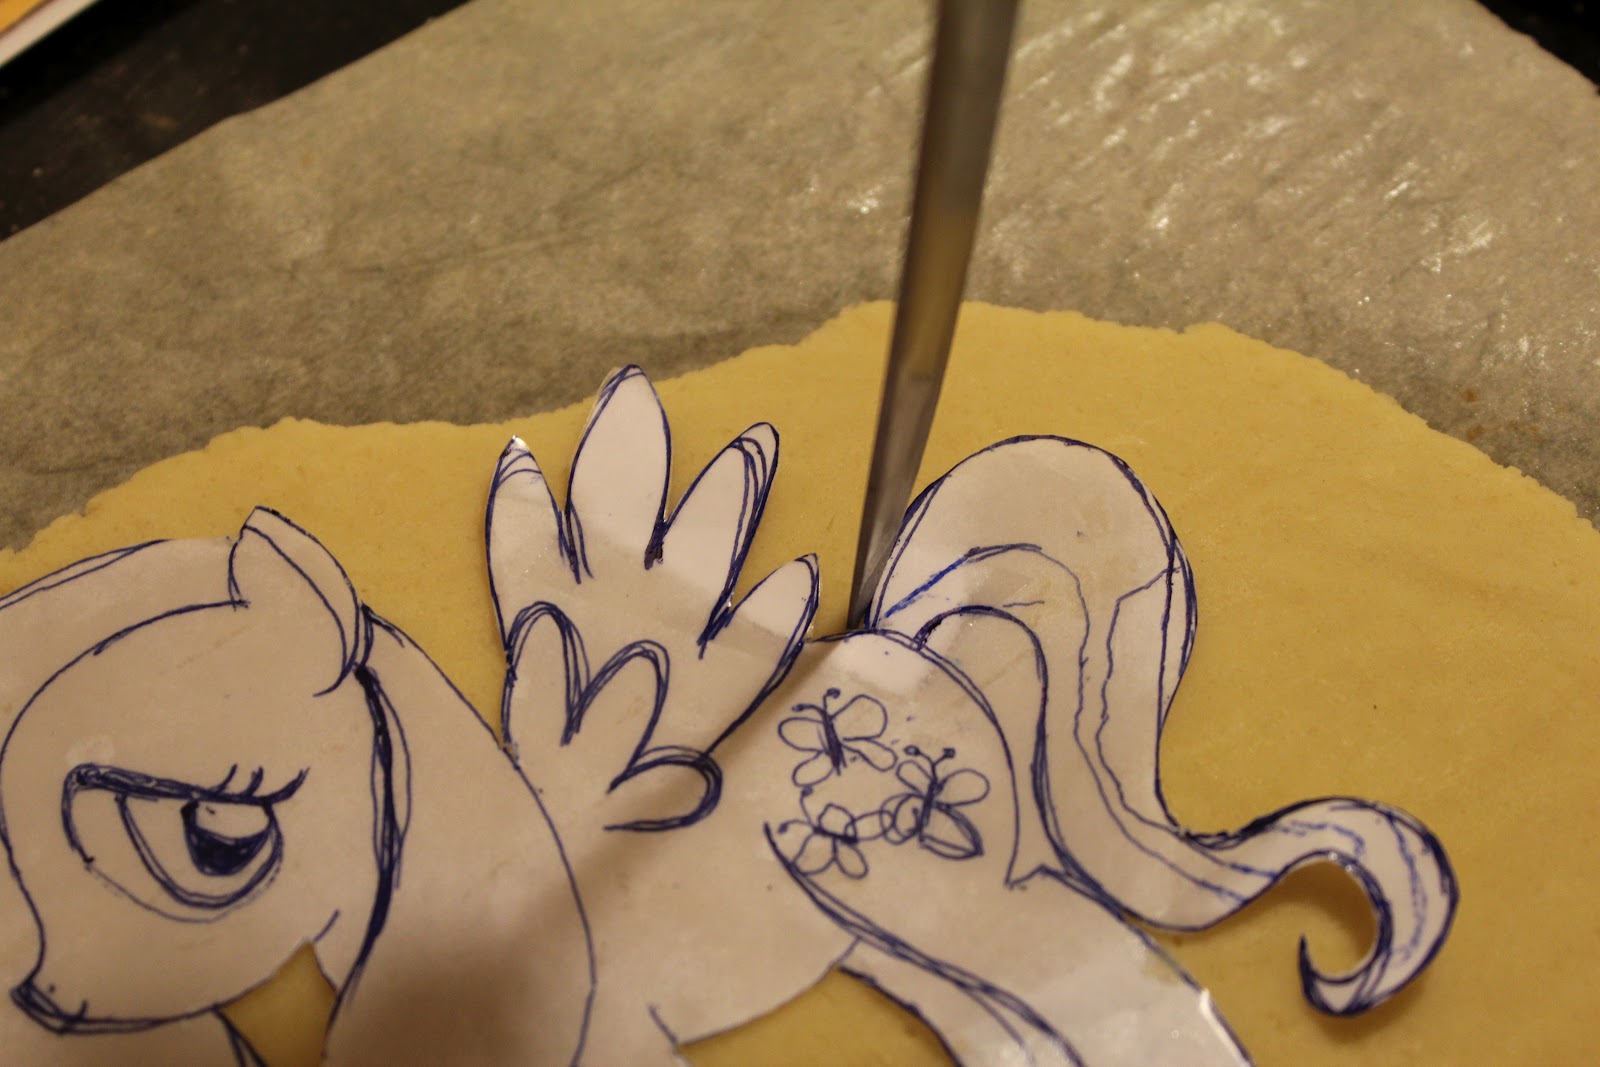
| Lay your image on the dough and cut the outline with a knife. |
 |
| Here's the cut dough.. Hubs says it looks like an elephant. I usually chill for 20-30 minutes before baking simply because all the cutting can soften the dough a lot. |
 |
| Bake |
Now after I bake the cookies, when any design is intricate and has distinctive proportions, I like to use a food pen to draw out the design before I get to the icing. It's more work, but it would kill me to ice freehand and then realize the proportions were incorrect.
 |
| Fluttershy drawn out with a food pen |
(Side note: Every time I type fluttershy, I first type shutterfly and have to backspace.. see, I still think I'm right! :))
 |
| You can see how none of them are perfect. The one on the right front didn't have a good head or eye, so I drew over it to fix it. That's the nice thing about drawing it first! |
Then I outline the image with black icing. I used a 15 second icing when I outline or my hand cramps from trying to pipe when it's too thick.
 |
| I tend to stay real close to the cookie on intricate parts and pull up and away on longer/straighter lines. |
 |
| Fill in the hair |
 |
| Fill in the body color. |
 |
| Using a #1 tip, Fill in the outer eye color (I filled in the black part when I was outlining) |
 |
| Fill in the blue |
 |
| Again with #1 tip, draw over the eyelash to make it stand out |
 |
| The butterflies |
Now, I was in a bit of a rush and didn't have any more clean #1 tips, and was trying to finish quickly, so I got sloppy here. Tried to make little butterflies, and really should have used a much thicker consistency of icing, but because I already had the the 15 second icing in the right colors, I just used that. Why go through the trouble of taking it out of the bags and thickening it? Well, it spread too much and didn't have the pretty detail I wanted. Oh well, you win some, you lose some.
Here are the cookies finished and ready to go.. I think there were about 18 in all. They dry matte, but with a slight sheen.
 |
| Funny thing is that I wanted to cut all the cookies around the wings individually, but after like 2, I got too tired.. so what started as this, turned to... |
 |
| this. hehe I think it was fine. :) |
 |
| Had to pack these bad boys in quart bags because they were so big! |
Alrighty, hope this wasn't too picture heavy and your enjoyed the tutorial! Happy baking everyone!


Alice,
ReplyDeleteThese turned out so well! Everyone loved them! You are so talented! Thanks for taking the time to make these for Keily!
=) Jen
By the way, I also kept calling the pony shutterfly at first! My daughters both corrected me early on!
Thanks Jen! Glad everyone loved it. Makes me happy. :)
ReplyDeleteThat's awesome!
ReplyDeleteI wonder why the website would call it shutterfly if the name is fluttershy?
These are simply adorable.
ReplyDeleteNow I want to try something like this.
You have some interesting projects on this site. I'm following you to see what's next.
Thanks PrizedPixul. I'm so inconsistent with blogging. I always say I will then I forget and life gets in the way. hahah. I will try to post more projects and tutorials soon if people seem to like it. :)
ReplyDeleteShutterfly is a photo sharing service, while Fluttershy is the pegasus pony.
ReplyDeleteI enjoyed your first tutorial. I hope you do more.
ReplyDelete