Day 9!!! Words cannot express how I am feeling today.
Last two nights I've been doing the layering of vetiver, cedarwood, lavendar.. a deep breathe inhaling from what's in my hands.. and cedarwood and lavender in a diffuser at night. In the morning I'm often running around so I just have him inhale the oils from the bottle quickly before rushing off to school.
Last night my husband worked on his homework with him and he was very compliant and focused. I thought it was amazing!
This morning was a morning like none other. Usually it's a painful process of losing my patience with him because he's not listening and running around like a banchee before school. THIS morning was different. He got HIMSELF breakfast.. got ready for school right away when I asked him (granted he couldn't find shorts so I had to help him, but no struggle to focus on the task at hand)... and the kicker... when I sent the kids to the car as we left the house (usually they're running around in the driveway).. he sat in the car, and was reading a book!!!! ARE YOU KIDDING ME?! I just had to stare at him because I was in disbelief. Now "A" does not enjoying reading, and he has difficulty sitting still enough to focus on a book unless I sit with him.
Now "A" is still "A'. He is his usual high energy self.. BUT he's toned down a notch. He can focus on the task at hand.. these are things that I never thought possible. As a stay at home mom I see all these minute difference and they add up to a whole lot! He might still be his crazy, happy go lucky self, but the things hes been able to accomplish this past week has kept me speechless! I feel nervous like I'm going to jinx it! :)
Friday, May 8, 2015
Wednesday, May 6, 2015
Day 6 Essential Oil Combo may be the trick
I was pretty disappointed that the Vetiver alone didn't do it for "A" in the first 5 days. End of day 6 (which was yesterday) we did a layer.. vetiver then cedarwood then lavender... all on the big toes and some on the back of the neck and then had his smell it from my palms. At night I put our usual vetiver in a diffuser.
Crazy thing happened... usually "A" takes quite a bit to fall asleep and tosses and turns for about 30 minutes. This night, 4 minutes flat.. sleeping! CRAZY! I thought it must be a fluke. This morning of day 7 he was still his usual self, but much easier to get ready for school and out the door! Could this be it? The combo??
Day 7, evening, did it again.. layered them one by one on the toes and around the neck. Instead I put cedarwood and lavender in the diffuser tonight. Again, out very very quickly! Let's see what tomorrow holds.. I'm getting excited! :)
Tuesday, May 5, 2015
Has it truly been years?? Starting fresh with essential oils- vetiver, cedarwood, lavender
How has the time gone by so fast.. 2012 was my last post. Life got chaotic.. another child, another job, a new house, etc. CHAOS CHAOS CHAOS.
I want to write a series of posts for myself.. to keep track of #2 progress on essential oils. I know.. this blog is absolutely random. That's me.. random.
#2, AKA "A" is a very hyperactive crazy kid. He's super loving and a big hugger but also unfocused and often times out of control. Heard some great things about essential oils and specifically vetiver, cedarwood and lavender on adhd kids and hyperactivity. So here goes...
Day 1-5: Vetiver was applied "neat" to the big toes and occasionally to the back of the neck (only occasionally because it's a strong smell so I only did it when home).
On Day 2 I started using a diffuser at night to see if it would help. Thus far.. no change and no significant difference in his day to day life.
Day 6: Heard about layering.. will try vetiver to the big toes then layer cedarwood first.. will see how this goes.
Thursday, June 28, 2012
Felt Playhouse Introduction

So since I started blogging again, I thought I would do another tutorial on how to make one of these cute houses for your kids that slide over a table (it's supposed to be a card table, but who has the time to open up a card table every time your kids want to build a fort?). I'm making one for my dining room table.

So if you want to join me on my sew-a-long, please feel free to! A few friends of mine will be joining in, so if they allow me to take pictures of their process, I'll post it here! :) Again, bear with me as this is the first time making one, so I'm sure there will be errors to come.. and I'm sure there are better ways to make one, but this is my way. :)

2) Let's figure out how much felt you're going to have to buy. I go to Joann Fabrics because I can use a 40% off (sometimes 50% off) coupon on one cut of fabric. Felt doesn't go on sale that often. The cheaper felt (non-wool) I think comes in a 72" wide bolt. So let's do some math here. You will need...
 |
| 2 of these |
 |
| 2 of these |
 |
| 1 of these- perhaps in a different color felt? |
Do you like my doodling? Can you see the photoshop expertise? :) Yup, that's about the best I can do. Let's add a 1" seam allowance to each edge (the bottom edge can have one too just to make the bottom neat if you'd like, but I'm too lazy to sew when unnecessary). For me this looks like 36.5W, 60.25L, 30.5H. Now here comes my handy dandy doodling expertise again...

I try to maximize yardage here so you don't have to buy too much felt. I figure since it's felt and just a playhouse, you don't need to worry about the grain and can cut the pattern in any direction. I calculated that I need about 2 and 3/4 yards of fabric to be able to cut my 4 sections out like the above doodle. There will be a little excess that I can use for detailing. I wanted the roof to be a different color, so I just bought another yard and few inches for the roof piece.
Ok, hope that gets you started to figure out how much fabric you need to purchase. So go out and buy your fabric!! If you feel like you don't have a creative bone in your body, ask your child to draw out 4 walls of a house.. give him/her some suggestions and you'll have your blueprint ready to go! I'll show you our blueprint on my next post!
Tuesday, June 26, 2012
My Little Pony Fluttershy
So my 6 year old and I were having this argument about what this My Little Pony character's name was.

I INSISTED it was shutterfly.. like the website. She INSISTED that it was fluttershy. Somehow after discussing this for like an hour, I convinced the poor girl that it was shutterfly. Mommy always wins.. then we went to this My Little Pony birthday party where the birthday girl herself told me the pony was Fluttershy. AH! I led my poor girl astray because of my pride telling me that a 6 year could not know more than her much older and wiser mother. Oh the young will shame the old.
So I was asked to make these cookies for a friend's daughter's party and so I thought I would do my first tutorial. So bare with the me here if it's too wordy or boring. :)
First things first, draw the picture on a piece of paper. Because I don't own a kopykake and didn't want to spend $ on a cutter that I might never use again, I did this all by hand. I drew fluttershy and E embellished it with the butterflies and the stripe in the tail. :)
Now after I bake the cookies, when any design is intricate and has distinctive proportions, I like to use a food pen to draw out the design before I get to the icing. It's more work, but it would kill me to ice freehand and then realize the proportions were incorrect.
(Side note: Every time I type fluttershy, I first type shutterfly and have to backspace.. see, I still think I'm right! :))
Then I outline the image with black icing. I used a 15 second icing when I outline or my hand cramps from trying to pipe when it's too thick.
Now, I was in a bit of a rush and didn't have any more clean #1 tips, and was trying to finish quickly, so I got sloppy here. Tried to make little butterflies, and really should have used a much thicker consistency of icing, but because I already had the the 15 second icing in the right colors, I just used that. Why go through the trouble of taking it out of the bags and thickening it? Well, it spread too much and didn't have the pretty detail I wanted. Oh well, you win some, you lose some.
Here are the cookies finished and ready to go.. I think there were about 18 in all. They dry matte, but with a slight sheen.


Alrighty, hope this wasn't too picture heavy and your enjoyed the tutorial! Happy baking everyone!

I INSISTED it was shutterfly.. like the website. She INSISTED that it was fluttershy. Somehow after discussing this for like an hour, I convinced the poor girl that it was shutterfly. Mommy always wins.. then we went to this My Little Pony birthday party where the birthday girl herself told me the pony was Fluttershy. AH! I led my poor girl astray because of my pride telling me that a 6 year could not know more than her much older and wiser mother. Oh the young will shame the old.
So I was asked to make these cookies for a friend's daughter's party and so I thought I would do my first tutorial. So bare with the me here if it's too wordy or boring. :)
First things first, draw the picture on a piece of paper. Because I don't own a kopykake and didn't want to spend $ on a cutter that I might never use again, I did this all by hand. I drew fluttershy and E embellished it with the butterflies and the stripe in the tail. :)
 |
| I put packing tape around the edges so that the image was a little firmer when cutting the dough, and so the ink wouldn't be in direct contact with the dough. |
 |
| Roll out the dough |
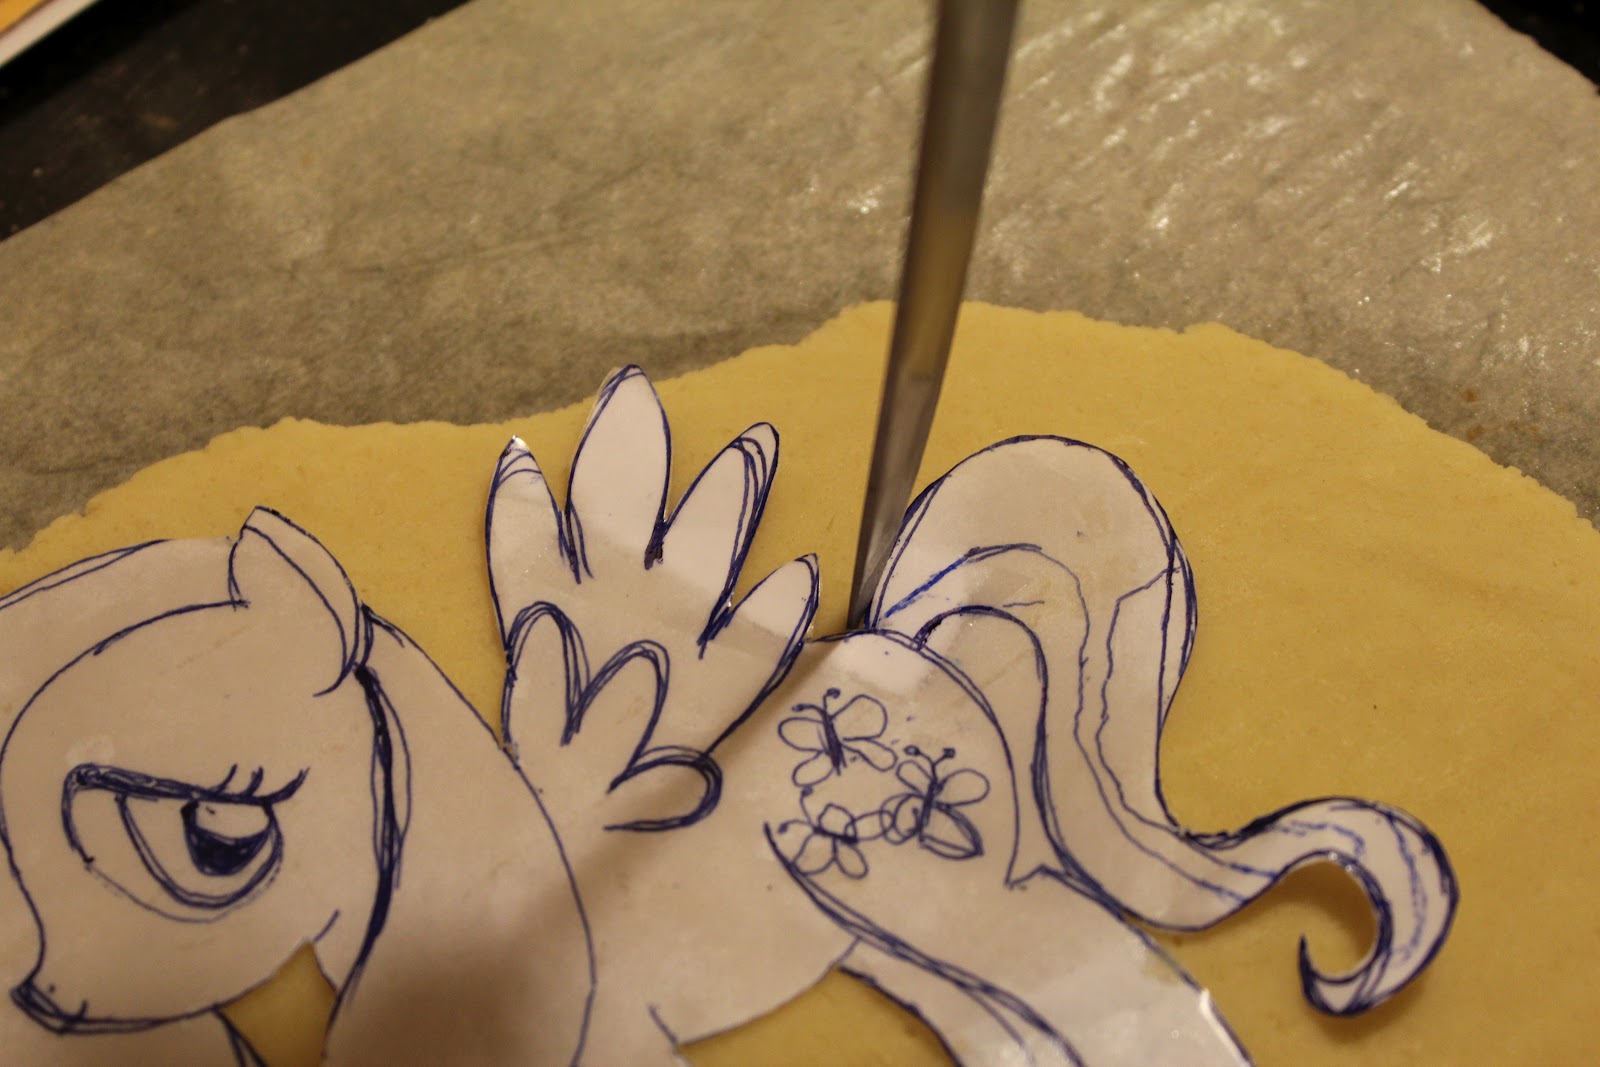 |
| Lay your image on the dough and cut the outline with a knife. |
 |
| Here's the cut dough.. Hubs says it looks like an elephant. I usually chill for 20-30 minutes before baking simply because all the cutting can soften the dough a lot. |
 |
| Bake |
Now after I bake the cookies, when any design is intricate and has distinctive proportions, I like to use a food pen to draw out the design before I get to the icing. It's more work, but it would kill me to ice freehand and then realize the proportions were incorrect.
 |
| Fluttershy drawn out with a food pen |
 |
| You can see how none of them are perfect. The one on the right front didn't have a good head or eye, so I drew over it to fix it. That's the nice thing about drawing it first! |
 |
| I tend to stay real close to the cookie on intricate parts and pull up and away on longer/straighter lines. |
 |
| Fill in the hair |
 |
| Fill in the body color. |
 |
| Using a #1 tip, Fill in the outer eye color (I filled in the black part when I was outlining) |
 |
| Fill in the blue |
 |
| Again with #1 tip, draw over the eyelash to make it stand out |
 |
| The butterflies |
Here are the cookies finished and ready to go.. I think there were about 18 in all. They dry matte, but with a slight sheen.


 |
| Funny thing is that I wanted to cut all the cookies around the wings individually, but after like 2, I got too tired.. so what started as this, turned to... |
 |
| this. hehe I think it was fine. :) |
 |
| Had to pack these bad boys in quart bags because they were so big! |
Thursday, June 21, 2012
Violin Cookies
Here's another fun cookie! Made Violin cookies for a friend this week to give to their kid's violin teachers. They were simple, delicate and fun!
Lately I've been cutting all these cookies by hand because 1) I'm too lazy to go looking for a cookie cutter, 2) There isn't a great selection of cutters anywhere near home. I should probably buys some cutters, but you know the moment that I decide to purchase a select few, I'll never use them and then will be in need of other ones.. know what I mean?
 |
| Some of them had 3 strings because I didn't think to look at a picture until I already did a few :) |
 |
| Orchestra anyone? |
Sunday, June 17, 2012
Twin's Baby Shower cookies
I love the idea of "two peas in a pod".. So when a friend asked to make cookies for a friend's twin baby shower, I just jumped at the chance!

In retrospect I wish that I made the peas in a flesh tone.. oh well, next time! :)

In retrospect I wish that I made the peas in a flesh tone.. oh well, next time! :)
Subscribe to:
Posts (Atom)