Showing posts with label Crafts. Show all posts

Thursday, June 28, 2012

Felt Playhouse Introduction

There has been a myriad of playhouses out in the internet world that I have been admiring for some time now.  I've been meaning to make one for the kiddies for a VERY long time.  Here's one on Homemade by Jill's Blog that I absolutely love!


So since I started blogging again, I thought I would do another tutorial on how to make one of these cute houses for your kids that slide over a table (it's supposed to be a card table, but who has the time to open up a card table every time your kids want to build a fort?).  I'm making one for my dining room table.


So if you want to join me on my sew-a-long, please feel free to!  A few friends of mine will be joining in, so if they allow me to take pictures of their process, I'll post it here! :) Again, bear with me as this is the first time making one, so I'm sure there will be errors to come.. and I'm sure there are better ways to make one, but this is my way. :)

1) Let's start by taking some measurements.  You'll need the Width, Length, and Height of the table that you want your playhouse to go on top of.


2) Let's figure out how much felt you're going to have to buy.  I go to Joann Fabrics because I can use a 40% off (sometimes 50% off) coupon on one cut of fabric.  Felt doesn't go on sale that often.  The cheaper felt (non-wool) I think comes in a 72" wide bolt.  So let's do some math here.  You will need...
2 of these
2 of these
1 of these- perhaps in a different color felt?

Do you like my doodling?  Can you see the photoshop expertise? :)  Yup, that's about the best I can do. Let's add a 1" seam allowance to each edge (the bottom edge can have one too just to make the bottom neat if you'd like, but I'm too lazy to sew when unnecessary).  For me this looks like 36.5W, 60.25L, 30.5H.  Now here comes my handy dandy doodling expertise again...

I try to maximize yardage here so you don't have to buy too much felt.  I figure since it's felt and just a playhouse, you don't need to worry about the grain and can cut the pattern in any direction.  I calculated that I need about 2 and 3/4 yards of fabric to be able to cut my 4 sections out like the above doodle.  There will be a little excess that I can use for detailing.  I wanted the roof to be a different color, so I just bought another yard and few inches for the roof piece.

Ok, hope that gets you started to figure out how much fabric you need to purchase.  So go out and buy your fabric!! If you feel like you don't have a creative bone in your body, ask your child to draw out 4 walls of a house.. give him/her some suggestions and you'll have your blueprint ready to go!  I'll show you our blueprint on my next post! 

Monday, June 11, 2012

The Mad Hatter

Now speaking of old halloween costumes... I don't think I ever posted about the Mad Hatter costume A was dressed as in 2010.  E was Alice in Wonderland and A was the Mad Hatter.  Since there are only so many years that these kiddies will allow me to make them match, I had to take advantage before they started to have major opinions. :)


A was such a good sport!  He really loved the hat and the kids still play with it to this day!  Here are some of the spiffy pieces.


 Pants made from DANA which I have made a bajillion times now.  Vest was a makeshift from some measurements I took (notice the ghetto fabulous buttons... yes, that's permanent marker folks.. ).  Of course the hat that makes the outfit made with poster board, a hanger and some fabric.

My sweet Alice and her Mad Hatter friend.

The jacket was also a makeshift from some remnant fabric that I just pieced together.. The funny thing is that A never got to wear the pants out!  Right as we got to our Halloween party he spilled chocolate milk all over  himself! Luckily it was only on the pants and I had an extra pair in the car.. but they never fulfilled their lifelong dream of being worn out (pun intended). :)

Sunday, June 10, 2012

An Angel, a Crayon and a Wiggle

Such a retroactive post, but I thought I'd start blogging again! :)  There are so many projects that I never posted about, that I thought I'd go back through some old crafts in the past year (possibly year-ssss).  Here are the kids on Halloween this past year.  Big E was an angel made from an old flower girl dress that was donated to us by my friend's mom's dry cleaners. haha.  Someone left an old flower girl dress that looked like it was from 20 years ago and so I made some sleeves from tulle, got a $1 halo from the dollar store and whipped up some wings using 2 hangers and some $1 pantyhose... gotta love the dollar store!


She was walking in a parade and decided to put on whiskers.. haha.  She's the creative one. :)  Now baby E was a makeshift crayon from a large bolt of orange felt that I had at home.  Don't ask why, but I had like 8 yards of orange felt for some reason so I just made a little bunting outfit for him with velcro on the back.  Too bad he stayed in it for about 10 seconds to take the picture then proceeded to cry until I took it off.  All that labor for 10 seconds.. worth it?  You decide. :)


You can also see A in his Murray Wiggle Costume.  Yes, that is Murray Wiggle.  We tried so hard to get him to be something else.. but that is ALL he wanted!  Lucily this was the easiest costume of all.  A little logo printed on printable inkjet paper and I appliqued it on and a little felt belt with the same logo.  The hubs stayed up to make a matching guitar for him and he was thrilled!


But he was NOT thrilled to take this picture at a pumpkin fest.  He had just about had it until he saw the balloon pit...


He refound his purpose in life..  :) Love that crazy boy with that crazy hair. :)

Wednesday, May 11, 2011

Terry Cloth Clothes

After having baby E, I can't imagine taking all three kids to the pool this summer.  The thought of undressing them all, washing the chlorine off, then drying and dressing them again is unsettling to me.  That's a lot of work!  So I thought what if I could at least cut out one step by just drying/dressing all at once without carrying multiple articles of clothing.  I think that would help a little right? :)  So here's what I came up with..

Terry Cloth Clothes! :)  Ignore the stained dress.. jajang myun explosion.

I bought 2 cheap terry cloth towels from walmart for $1.95 each.  Shirring the top, added elastic straps and voila!  She wouldn't take it off all day!  The idea came from Dana's Beach Towel Dress.

A's outfit is just a one piece jumper from a green terry cloth towel.  I put an existing shirt and pant on top of the towel, cut out a pattern and then bound the raw edges with some biased tape I had.  Of course for ease the straps are velcroed at the top. :)
Something about this outfit reminds me of the sound of music when she made clothes out of the curtains. haha


Friday, April 1, 2011

Dress Pants

Can't believe it's been several months since my last blog post.  If you didn't know, baby #3 came in the beginning of March, so you can understand my lack of posting.  Plus, I've been preoccupied with facebook to tell you the truth.  It seems that for stay at home moms (or maybe just me).. it's an outlet to the world.  It's comforting to know that people are living exciting lives out there and doing crazy things.  I can live vicariously through you. :)  But sadly people have not been posted as often and I do find that I'm craving a connection with people again.  SO POST SOMETHING for me! :)

Anyways.. I've been keeping busy by spending my maternity leave crafting, baking and surfing the web for new projects.  A friend of mind gave me a lot of khaki fabric a while back and I wasn't quite sure what I would do with it.  So I took a tutorial from Dana and made Auggie some khaki pants.  It turned out wonderfully!  Eddie asked if I was going to put in some pockets, but I'm too lazy.  Instead I'd rather make several of these!


Ignore the unironed fabric. :)

The hemline. 

The elastic back and double stitched waistline.  Ignore my mail. :) 

I tried to put in a label, but it's kind of ugly because I sewed over it.  It was too large. haha

So it was my first experience at pant making and I've gotta say it was pretty easy!  But it could be that it's a super small pair of pants. :)

Thursday, January 20, 2011

How do I have time to craft- Hat project

So lately people have been asking me how I manage to do all these little projects while I'm pregnant with two kids.  Well, allow me to let you in on my little secret... it's called "coping mechanism".  There are two things that I do to cope with life.  1) Veg out and watch TV or 2) I find new projects to feed my perfectionism.  Yes, believe it or not, I am a perfectionist.. My house my be filthy, my kids unruly, but I am a perfectionist when it comes to having this inward drive to learn new things.  So if you find that I am making massive amounts of desserts or making new projects daily, I am coping with the fact that I cannot control my world around me.  With two kids you realize very quickly how little control you have.

I would like to say that every time I feel a loss of control, I turn to God to seek peace and ultimately relinquish my control issues to him.  But there's this itty bitty voice that wants to gain control of everything in my life.. to rule over everything.. essentially become my own God.  There is this still small voice that tells me to look at the cross of Christ and see why Christ had to do what he did so that I, my own inner God, can submit and know the only true and living God who really is the ONLY one in complete control.  Ok, this is getting too heavy... so what it boils down to is the battle of Christian living.  Not just dying to my own habits, and behavior modify.. but rather see the glorious cross and finding the grace that's freely given.  As character changes, behavior will follow.  

So for now, don't judge me when I show you my new creations. :)  I'm a work in progress. :)  OH.. and I don't craft daily either.. sometimes I do multiple projects on a Saturday and blog about them individual through the week.  hahah  With all that said, I'll end on a lighter note.  Here's a hat I made for the baby..

 It was supposed to be a strawberry hat (Cynthia, I went home and made it after I saw yours), but I didn't have green for the leaf, brown for the stem, etc.. so I just made an Acorn-like hat.  I think I don't like the leaf so I'm going to cut it off.. but then my sister asked me why the hat would have a stem at the end?  I don't know. :)

Then Elizabeth saw me making that hat and asked for one for herself.  She wanted a flower hat, so I made a cute skull cap with crocheted flowers.

 She asked me why it was so tight, and I told her that's how she's supposed to wear it.


Aren't they cute?

Eddie asked me why I don't make anything for Auggie. Sad right?  I guess I never think to make anything for him.  It's cute to make girl stuff and baby stuff, but boy stuff?? boring... well, I'm going to look forward to celebrate the boy month at MADE starting in February!  Can't wait to see what they come up with.

Monday, January 17, 2011

Maternity Shirt into Girl's Dress

My mom decided to give me this maternity dress because she thought it was "cute".  Have you ever wondered what qualifies as "cute" to an older Korean mother?  Well, I have often wondered this mystery myself because the moment I put on this tent-like shirt, Eddie busted out laughing for 10 minutes straight.  I would have taken a picture of myself in it if I were brave, but when I looked in the mirror, the only words that came to mind was sumo wrestler.

So trying to be resourceful I thought I'd try to "save" this shirt since the embroidery was pretty and so were the buttons.  I really wanted to make a pattern that I could use over and over and have very little to cut and sew. (Because I'm lazy).  So I drafted this pattern by using Elizabeth's measurements.


I made some adjustments to the seam allowance because I realized there wasn't much ease around the waist/armpit.  So this design was the back piece.. The arm would fold over so I essentially only had 2 seams. 1) across the diagonal line from neck-armpit. 2) Under the sleeve down to the bottom hem!


Cut out the pattern on some muslin to see if it was the right measurement.. this is before I cut from the sumo shirt.


Here is the sumo shirt.. when did people where this kind of maternity wear??  As you can see, I've already drawn out the front pattern piece.


Here's the finished product.  Not the best picture, but still the best girl. :)  Fits her perfectly!


Thursday, January 6, 2011

Diaper Bag/ Diaper Case

So I haven't completed my infant car seat padding yet, but all that is left is the binding.  I have a hard time finishing projects when I start it days before.  That's usually why I start and finish things in the same day, because I know I'll never do it if I put if off! :)

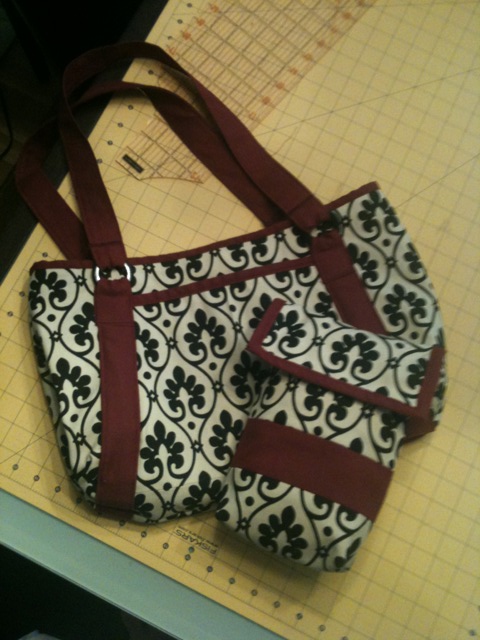
So my newest project was this cute little hobo bag!  With baby #3, there's not many new things you can buy since you have everything you need from the previous babies.  I'm too cheap to go out and buy a brand NEW diaper bag, so I thought I'd just make one.. here it is.

 I love the colors of the bag.  Black/White with accent of deep burgundy.

 Here's the inside of the bag.  Pretty roomy with a magnetic closure.  I don't know why it looks purple here.. hahah must be the lighting!

 This is the back of the bag.  I kinda wish I put a pocket on this side too.


Well, I had all these scraps of fabric left, so I thought I'd make a matching diaper holder.  I hate throwing away scraps when they're not tiny. :) Here it is.
 I wish the flap was a little narrower, but that's okay.  I like the binding! I had JUST enough red leftover.

 (4) Size 4 diapers.  I think it's roomy enough to hold a wipes case in there with it.  The inside is lined with a woven muslin/linen type fabric.  Another piece from my scrap pile.

 I only had scraps left, so I just pieced it together. :)

The bag and diaper case together!

All in all it took about 1/2 a day to put together.  Not bad for a cheap bag/diaper case.  Thanks for reading. :)

Thursday, December 23, 2010

Fast Bibs

Being indoors during this holiday season has made me want to make crafts. I need instant gratification so I like to make these quick little projects.  Joann Fabrics had this cute little pattern that's like an oilcloth material.  Perfect for quick wiping bibs!!


I think the easiest thing to do is make a pattern from an existing bib... I wanted it a little longer and slightly wider than this bib.

Draw it with a pen.. since it's easier to use and the marks are easily covered when bound.

Make multiple patterns using weights (easier and quicker than pinning).

 Add on the binding and it's done!

 The finished product! Cute isn't it?


The velcro attachment in the back.

Total cost was about $4.  I made about 6 bibs with 1/3 a yard of fabric and 3 packs of binding. Very quick to make.  Less than an hour of work and my craft craving is done for the day. :)

Monday, December 20, 2010

Infant Carseat Cover

Sorry I haven't been blogging much lately everyone!  I've been wanting to replace my carseat cover for some time now because it's old and worn after two kids. :)  With the new baby coming in March I thought it would be a good time to revamp the carseat.

I was inspired by dana and her amazing carseat covers (you have to search her archives because I don't think she makes then anymore).  It took some time to create a pattern since I'm too cheap to buy one. :)  But I think it was well worth the effort since I can now use it to make multiple covers.  Here is the old carseat...


And the beginning of the new one.  I still have to add some more batting to the back to make it more cushy because I used a thinner batting on accident.  It's not as fitted as the other one because I haven't put the binding around the edge since I still have to add more cushioning still.

It's actually an aqua/brown combo but it looks white here doesn't it? :)  After I finish it I'll have to do the canopy to match! So for less than $10 on material (including the muslin to make the pattern) I've got a brand new carseat!  Wait scratch that.. I still need more material.. so maybe under $20.. mistakes can be costly. :)


I'll post the finished one when I'm done.  Maybe we should add it to the baby beean line. :)

Tuesday, October 5, 2010

Alice in Wonderland Kids Costume

Hello faithful readers.. yes, I have been out of my blogging mode for a while now.. but now that I have more energy (in the second trimester) I feel motivated to do a little more.. I posted this on my facebook already, but thought I'd try to keep my blog "relatively" up to date. :)

E has been wanting to be Alice in Wonderland for some time now.. I went to the store and found this cheap costume for $20-$25!  I was mortified at the cost of Halloween costumes!  The fabric alone probably cost the manufacturer 30 cents!  So I decided to try my hand at sewing my own.  I usually go buy a pattern, but I was too cheap to do it, so I reference this book that I have...

By the way, I LOVE this book!  It's very helpful if you're new to making patterns.

Anyway.. referenced the book and make E's costume from scratch!  I should have taken pictures of the process, but I was too lazy.  Next time. :)

Though it's unironed, I think it turned out pretty good!  Eddie thinks it looks like a waitress uniform though.. boo Eddie.  I'm thinking of selling the pattern for some money. hahha. 

The back

 The cutie in just the dress.. I'll take a picture with her full costume once it's ironed. :)


Next time.. the Mad Hatter..